
A well-sharpened pocket knife is a versatile tool, essential for outdoor enthusiasts, tradespeople, and anyone who values preparedness. Yet, the art and science of sharpening a pocket knife often spark debate, especially around the pivotal question: What angle should you sharpen a pocket knife? Get it right, and your blade slices smoothly and holds its edge. Get it wrong, and even the finest steel dulls prematurely or chips under pressure.
Choosing the optimal sharpening angle isn’t just about numbers; it’s about understanding your knife’s purpose, blade geometry, and the steel’s properties. Whether you carry a classic slip-joint for everyday tasks or a robust tactical folder, the sharpening angle you select will directly impact cutting performance, edge retention, and durability.
In this comprehensive guide, we’ll break down everything you need to know, from the fundamentals of sharpening angles, to real-world case studies, to actionable steps for consistently achieving razor-sharp results.
Key Takeaways
- Sharpening angle directly affects edge sharpness, durability, and performance, find the right balance for your specific pocket knife and use case.
- Common pocket knife angles range from 15° to 25° per side; lower angles yield sharper but more delicate edges, while higher angles favor durability.
- Blade steel, intended use, and maintenance routine all influence ideal sharpening angle.
- Consistent angle maintenance is crucial, use guided systems or angle guides to help, especially if you’re a beginner.
- Real-world examples show the trade-offs between sharpness and toughness at different angles.
- Proper sharpening technique matters as much as angle, even the best angle won’t compensate for poor technique.

Credit: nobliecustomknives.com
Understanding Sharpening Angles: The Basics
Sharpening angle is the angle formed between the blade’s edge and the sharpening stone (or other abrasive surface). For double-beveled blades, such as most pocket knives, this is measured per side. The total included edge angle is therefore double the angle per side.
For example, a 20° per side angle results in a 40° inclusive edge.
What Is Edge Geometry?
Edge geometry refers to the cross-sectional profile of the blade’s edge. Pocket knives typically feature a V-shaped bevel, although convex, chisel, and compound grinds exist. The angle you choose to sharpen determines how acute (sharp) or obtuse (durable) this edge will be.
Why Does Angle Matter?
- Sharpness: Lower angles (15°, 17° per side) produce a finer, sharper edge, ideal for slicing.
- Durability: Higher angles (20°, 25° per side) create a thicker edge, resisting chipping and rolling.
- Edge Retention: A well-matched angle preserves sharpness longer, reducing maintenance.
Measuring And Maintaining Angles
Accurately maintaining a consistent angle is key. You can use:
- Sharpening guides or jigs for repeatability
- Marking the edge with a permanent marker to check your progress
- Visual estimation (for experienced sharpeners)
Pro Tip: Beginners benefit greatly from guided systems, which remove guesswork and ensure even bevels.
Credit: smithsproducts.com
Choosing The Right Angle For Your Pocket Knife
Selecting the right angle depends on your knife’s intended use, steel composition, and personal preferences. Here’s how to make an informed choice.
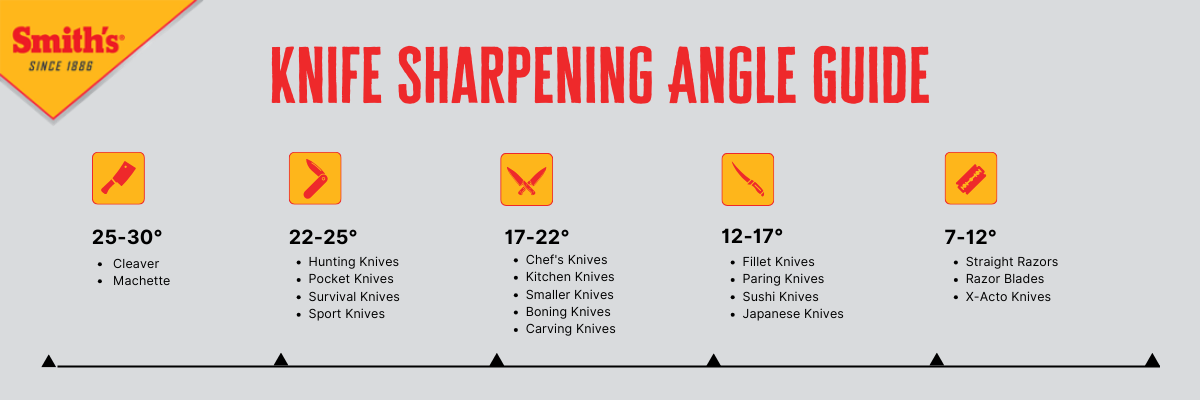
Common Pocket Knife Sharpening Angles
| Angle Per Side | Included Edge Angle | Typical Use | Edge Characteristics |
|---|---|---|---|
| 10°, 15° | 20°, 30° | Razor blades, fillet knives | Extremely sharp, delicate |
| 15°, 17° | 30°, 34° | High-end EDC pocket knives | Very sharp, less durable |
| 18°, 20° | 36°, 40° | Standard pocket knives | Good balance of sharpness and durability |
| 20°, 25° | 40°, 50° | Outdoor, survival, tactical knives | Durable, less sharp |
Factors Influencing Your Choice
- Blade Steel
- Harder steels (e.g., S30V, M390) can support lower angles without chipping.
- Softer or tougher steels (e.g., 420HC, AUS-8) benefit from higher angles to avoid deformation.
- Intended Use
- Light-duty (EDC, food prep): 15°, 17° per side for maximum sharpness.
- Heavy-duty (woodcraft, prying): 20°, 25° per side for edge resilience.
- Maintenance Habits
- Frequent touch-ups allow for a sharper, more acute angle.
- Infrequent maintenance? Go slightly higher for edge longevity.
- Manufacturer Recommendations
- Many reputable brands specify factory edge angles. For example, Spyderco recommends 15°, 20° per side for most models.
Example: Comparing Edc And Tactical Folders
A Spyderco Para 3 (CPM S30V steel) performs optimally at 15°, 17° per side, excelling at slicing tasks. In contrast, a Benchmade Griptilian (154CM steel) used for harder chores benefits from a 20° per side angle, offering more robust performance.
The Science Behind Sharpening Angles
A closer look at metallurgy and physics reveals why sharpening angle matters so much for pocket knives.
Edge Strength Vs. Sharpness
The lower the sharpening angle, the thinner and sharper the edge. However, thin edges concentrate stress, making them more prone to damage under hard use. Conversely, higher angles distribute force across a wider edge, enhancing toughness but sacrificing some slicing ability.
Steel Hardness And Angle Selection
High-hardness steels (>60 HRC) can hold acute angles better, but may chip if abused. Tough, lower-hardness steels (<58 HRC) handle steeper angles and impacts well, but may not take as keen an edge. Understanding your blade’s steel composition can guide you toward the sweet spot.
Data-driven Angle Comparison
| Steel Type | Recommended Angle (per side) | Edge Retention (relative) | Chipping Risk |
|---|---|---|---|
| VG-10 | 17°, 20° | High | Moderate |
| CPM S30V | 15°, 17° | Very High | Low, Moderate |
| 420HC | 20°, 22° | Moderate | Low |
| AUS-8 | 18°, 20° | Medium | Low |
| D2 | 18°, 20° | High | Moderate, High |
*Source: Knife Informer*
Case Study: Edge Angle Failure
A field test documented by Blade Magazine found that a 15° per side edge on a D2 blade held up to repeated slicing but chipped when used to baton wood. A 22° per side edge survived the same abuse, albeit with slightly reduced slicing ability. This underscores the importance of matching angle to use case.
Credit: www.youtube.com
Sharpening Techniques For Consistent Angles
Achieving and maintaining the correct angle is just as important as choosing it. Here are proven techniques and tools to help you sharpen like a pro.
Guided Sharpening Systems
Guided systems, such as the Lansky Sharpening System or Wicked Edge, lock your knife and abrasive at a fixed angle, ensuring precision. These are particularly useful for beginners or those seeking repeatable results.
Benefits:
- Consistent angles
- Easy to use
- Less risk of damaging the blade
Freehand Sharpening
Freehand sharpening with whetstones or bench stones requires more skill but offers greater flexibility. Maintaining a steady angle is challenging but can be mastered with practice and feedback.
Tips for Success:
- Use angle guides or visual cues (e.g., matchstick under the spine)
- Mark the bevel with a marker to track removal
- Practice slow, controlled strokes
Using Sharpening Rods And Pull-through Sharpeners
Ceramic rods and pull-through sharpeners offer quick touch-ups but may not provide the best angle control. Some models have preset angles (typically 20° per side), making them convenient for maintenance but less customizable.
Example: My Experience With Angle Guides
In my experience, switching from freehand to a guided system for my EDC knife improved both sharpness and edge longevity. The difference in slicing paper or food was immediately noticeable, and I spent less time correcting uneven bevels.
Real-world Examples: Matching Angle To Task
Seeing how sharpening angle impacts real-life performance helps clarify the right choice for your needs.
Example 1: Edc Knife For Office And Food Prep
A user sharpens their Victorinox Alox Cadet to 15° per side. Result: The blade slices paper and fruit effortlessly, but the edge rolls after opening cardboard boxes. Solution: Increasing to 18° per side balances sharpness and resilience, minimizing edge deformation.
Example 2: Outdoor Survival Folder
A camper sharpens their Ontario RAT II (AUS-8 steel) at 22° per side before a multi-day trek. The knife easily carves wood and splits kindling, and the edge stays intact after heavy use. When resharpened at 17°, the blade becomes noticeably sharper but chips during batoning.
Example 3: Tactical Knife For Emergency Use
A first responder maintains their Benchmade Mini Griptilian at 20° per side. The edge withstands cutting seatbelts and plastic, with minimal chipping or rolling. At a lower angle, the knife performs better at slicing but needs frequent maintenance.
Pro Tip: Test your edge on the tasks you perform most often, fine-tune your angle based on performance, not just theory.
Common Mistakes And How To Avoid Them
Many users struggle with sharpening angles. Here’s how to sidestep the most frequent pitfalls.
Using The Wrong Angle For The Task
Sharpening too steep (low angle) for heavy-duty use leads to edge damage. Sharpening too high for fine slicing makes the blade feel dull. Always align angle with real-world application.
Inconsistent Angle Maintenance
Switching angles every time you sharpen leads to uneven bevels and poor performance. Stick to a chosen angle and maintain it for your knife’s lifespan.
Over-sharpening Or Removing Excess Metal
Aggressive sharpening wears down the blade prematurely. Use gentle strokes and check progress frequently.
Neglecting Edge Finishing
Skipping finer grit stones or strops leaves a rough, toothy edge that dulls quickly. For best results, finish with a polishing stone or leather strop.
Relying Solely On Pull-through Sharpeners
Pull-through sharpeners are quick but can damage or over-grind the edge, especially if the preset angle doesn’t match your blade. Use them sparingly and only for quick touch-ups.
How To Sharpen Your Pocket Knife At The Right Angle: Step-by-step
Applying the right angle is a practical skill. Here’s a step-by-step guide for achieving professional results.
Step 1: Gather Your Tools
- Sharpening stones (coarse, medium, fine grits)
- Angle guide or sharpening system (optional)
- Leather strop and polishing compound (for finishing)
- Marker (to mark the bevel)
Step 2: Set Up Your Angle
- With a guide: Attach the angle guide or set your sharpening system to the desired angle (e.g., 20° per side).
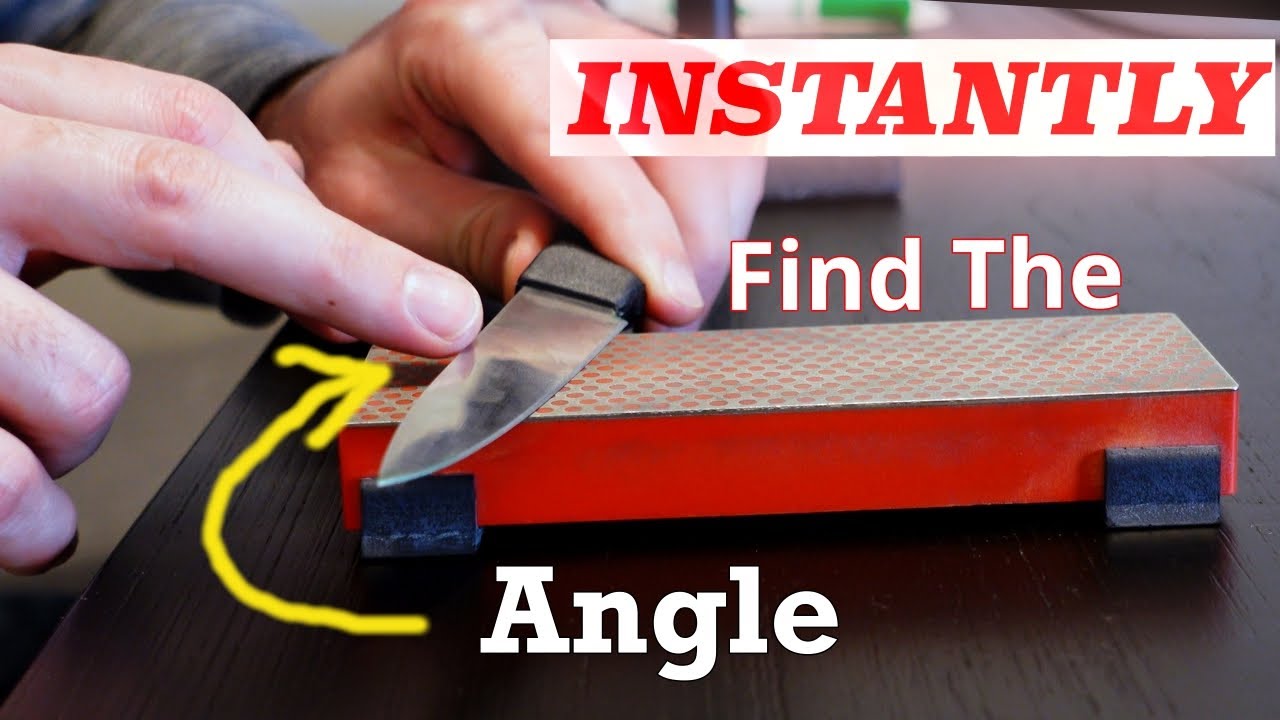
- Freehand: Visualize or use a simple aid (e.g., a coin under the spine equals about 15°).
Step 3: Mark The Bevel
Color the edge with a marker. As you sharpen, observe if you’re removing marker from the edge, the shoulder, or both, adjust your angle accordingly.
Step 4: Sharpen One Side
- Start with the coarse stone.
- Maintain your chosen angle throughout each stroke.
- Sharpen until you feel a burr along the edge.
Step 5: Switch Sides
- Repeat the process on the other side, matching the number of strokes or burr development.
Step 6: Progress Through Finer Grits
- Move to medium and fine stones, alternating sides.
- Finish with a leather strop for a razor edge.
Step 7: Test The Edge
- Slice paper, shave hair, or cut food, evaluate sharpness and adjust angle if necessary.
Example: If your knife slices paper but chips on cardboard, increase the angle by 2, 3° per side for more durability.
Angle Maintenance And Long-term Care
Keeping your knife at the right angle is an ongoing process, here’s how to make it easy.
Regular Touch-ups
Frequent, light honing with a ceramic rod or strop preserves your chosen angle and minimizes the need for major sharpening sessions.
Reprofiling: When And Why
If your knife’s angle has become inconsistent or too obtuse, reprofiling (reshaping the bevel to your target angle) may be necessary. Use a coarse stone and take your time; this process removes significant metal.
Storing And Protecting Your Edge
- Store knives dry and clean to prevent corrosion.
- Use edge guards or pouches for transport.
Example: Long-term Performance
A hiker who maintains their EDC at 18° per side finds that quick monthly touch-ups keep the knife performing at peak sharpness, with only occasional full sharpening required.
Comparing Sharpening Angles: Performance In The Field
Let’s review how different angles stack up in real-world scenarios.
| Angle (per side) | Sharpness | Durability | Edge Retention | Best For |
|---|---|---|---|---|
| 15° | Very High | Low | Moderate | Precision slicing, light EDC |
| 18° | High | Medium | High | General EDC, food prep |
| 20° | Medium | High | High | Outdoor, utility, tactical |
| 22° | Lower | Very High | Very High | Heavy-duty, survival |
Warning: Sharpening at too low an angle for tough tasks risks rapid edge failure. Always match your angle to the most demanding use your knife will face.
Frequently Asked Questions
What Happens If I Sharpen My Pocket Knife At Too Low An Angle?
If you sharpen your pocket knife at too low an angle (e. g. , 12°, 15° per side), you’ll achieve a razor-sharp edge, but it will be more fragile. This thin edge is prone to chipping, rolling, or becoming dull quickly, especially when cutting abrasive materials or performing heavy-duty tasks.
For most pocket knives, an angle under 15° per side is only recommended for specialized slicing or light-duty use.
Can I Change My Knife’s Sharpening Angle From The Factory Default?
Yes, you can alter your knife’s sharpening angle from the factory setting. However, this process, known as reprofiling, removes more metal and takes more time. Consider the steel type and intended use before changing angles. Some blade profiles and steels respond better than others to significant angle changes. Always check the manufacturer’s recommendations before proceeding.
How Do I Maintain A Consistent Angle When Sharpening Freehand?
Maintaining a consistent angle freehand is challenging but achievable with practice. Use visual aids like a sharpening angle guide, or mark the bevel with a permanent marker to track your progress. Some sharpeners use a stack of coins or a matchstick under the spine to approximate angles.
Slow, deliberate strokes and frequent checks help build muscle memory.
Should I Use A Different Angle For Serrated Pocket Knives?
Serrated knives require a specialized approach. Typically, you only sharpen the beveled (serrated) side, maintaining the factory angle, often between 20°, 25°. Use a tapered rod or specialized serrated knife sharpener to fit the serration grooves. Avoid sharpening the flat side, as this can damage the serrations. For optimal results, consult your knife’s manufacturer or refer to a detailed guide such as WikiHow.
Does Stropping Affect My Sharpening Angle?
Stropping can slightly round the apex of your edge if done at a much higher angle than your primary bevel, but it generally preserves your sharpening angle when done correctly. Use a light touch and maintain an angle just above the bevel.
Stropping polishes and refines the edge, improving sharpness without removing significant metal.
A perfectly sharpened pocket knife feels like an extension of your hand, ready for any task, from slicing an apple to carving wood on the trail. Mastering the relationship between sharpening angle, blade steel, and intended use empowers you to keep your knife at peak performance year after year.
With the right angle and sharpening technique, your pocket knife becomes a tool you trust, sharp, durable, and always ready for action.